

Internet Explorer 4.0 and FormFlow 99 Filler Installation Instructions for Windows NT
This automated installation process installs Internet Explorer 4.0 (IE 4.0) and Form Flow 99 Filler on you PC Desktop. This installation process consists of logging on to your PC as an Administrator; then downloading and executing the Windows NT IE4.0/FormFlow Filler Installation Package. These instructions walk you through downloading (saving) the installation file to your Desktop; then by clicking on this saved file you begin the automated installation. Depending on your PC's resources (speed and memory) this installation process may take from a few minutes to up to an hour to complete.
When the installation is completed you will go to the AIS Electronic Forms (E-Forms) web site and open a form to test the installation.
In order to install the Windows NT IE4.0/FormFlow Filler Installation Package you must:
Step 1: Selecting the installation package/file to download

Under Option 3 click on Windows NT IE 4.0/FormFlow 99 Filler Installation Package. This will open the Save As dialog box
Step 2: Downloading (saving) the file to your Desktop

When the Save As dialog box appears use the scroll arrow on the right side of the list box. SCROLL UP and locate the folder called Desktop. (There are 2 or more folders called Desktop. One for you personal logon id and one for the Administrator id. The correct one is at the very top of the list in the dialog box.) Click on the Save button. This sends the file (nt4sp3_i) to the Administrator's Desktop. This may take several minutes.
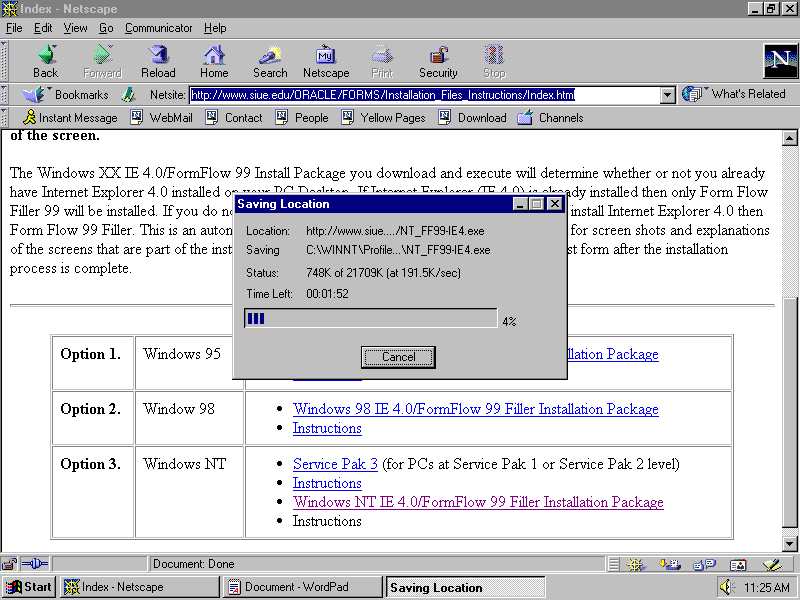
An informational window stating that the file is being downloaded to your desktop, no action required.
________________________________________________________________________
Step 3: Starting the Installation Process
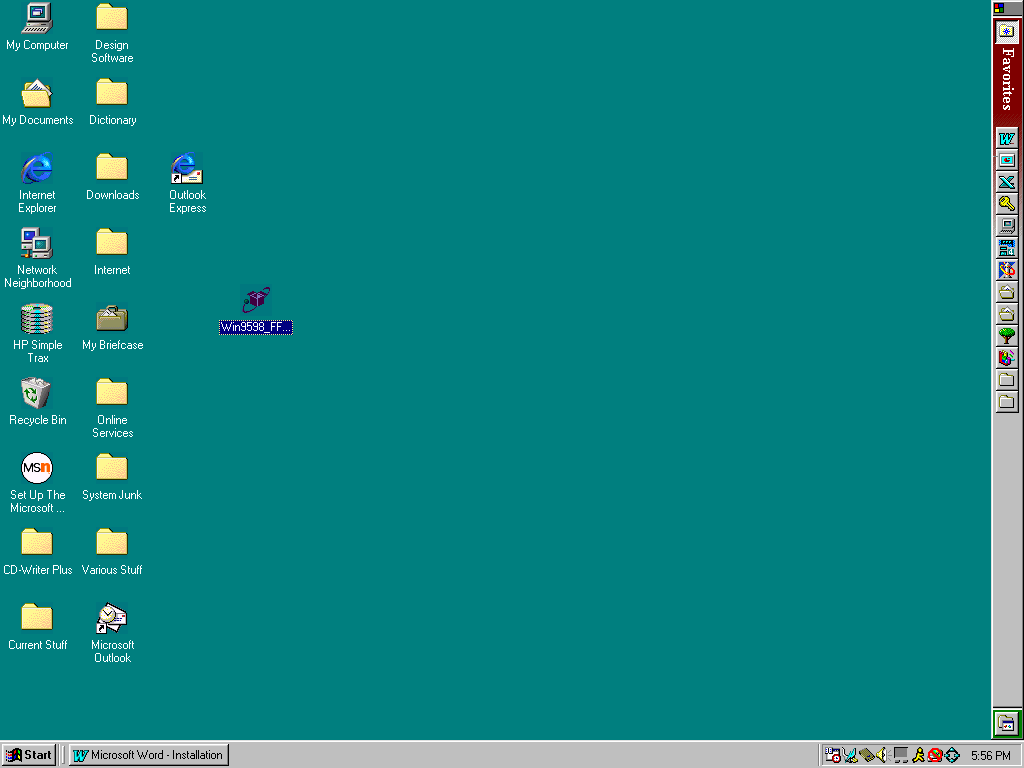
After the file has downloaded to your computer clicon File, Exit to close Netscape and return to your Desktop. On your Desktop locate the icon labeled NT_FF99-IE4.exe. Double click on the icon to start the installation process.
Step 4: Installing Internet Explorer (IE 4.0) software
If Internet Explorer 4.0 (IE 4.0) is already installed on your Desktop the installation process will automatically skip to Step 5.

By double clicking on the correct icon on your desktop you started the installation process displayed on this screen. This is informational only; no action required.

You are now in the installation process for Internet Explorer 4.0. Click on the OK button.

Click on the Next button.

This is your License Agreement. Make sure you click on the " I accept the agreement" radio button; then click on the NEXT button.

This is an information screen informing you that SETUP will install the required files in this program folder. Do not change the install folder destination just click on the Next button.

This is an informational screen only; no action required. This process may take several minutes.

On this screen click the OK button. Your screen may vary from the screen above.
Step 5: Filler Installation
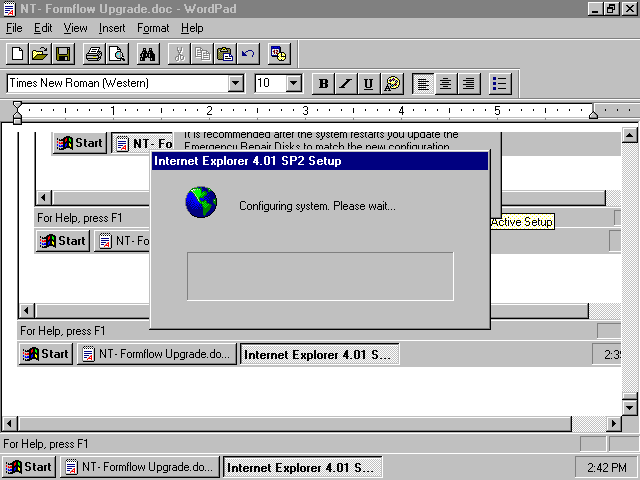
This screen is informational only; no action required. The process will take several minutes while your machine is being configured. Do not interrupt the process.
At this point your PC will automatically shutdown and reboot. (It will shutdown ONLY IF Internet Explorer 4.0 (IE 4.0) was installed by this installation process.)
During the reboot you will need to Logon as an Administrator again.

During the process between the last screen and this one (IE 4.0 install only) your PC may have shutdown and rebooted. Screen shots are not available for this documentation. When you see the screen above, your machine has been reconfigured and FormFlow 99 Filler has been installed. Click the FINISH button to complete the installation.
Step 6: Restoring your Desktop to the default settings after Internet Explorer IE 4.0 installation
Step 6 is performed only if this installation process installed Internet Explorer 4.0 (IE 4.0). Otherwise go to Step 7.
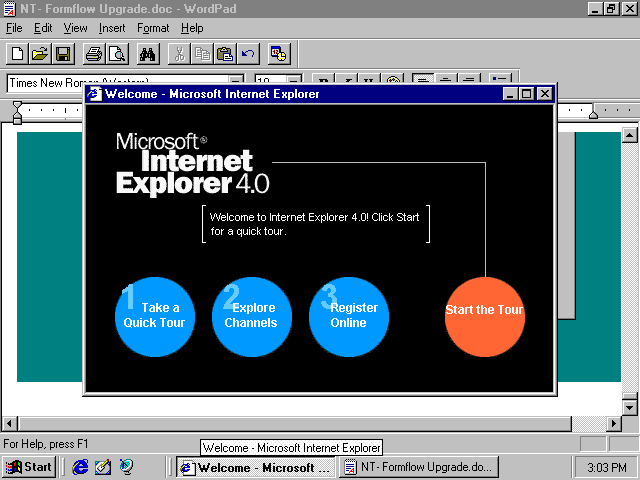
As a by product of the upgrade process this Window (Microsoft Internet Explorer 4.0) will appear. To close it click on the X in the upper right corner of the (black) window.

Donít panic!. The installation process, by default has installed "black" wallpaper as a default on your Desktop. (If you have a screen saver or wallpaper on your Desktop you will not see this black screen. Go to Step 7.) You will now change it back to the original default. See the screen print below.
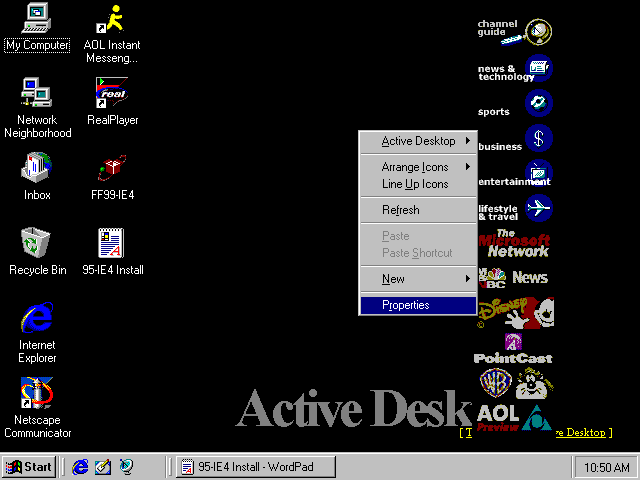
To change your Desktop back to its original color place your pointer on an empty spot on your Desktop and click with your right mouse button. From the menu click on Properties, which will open the Display Properties window.
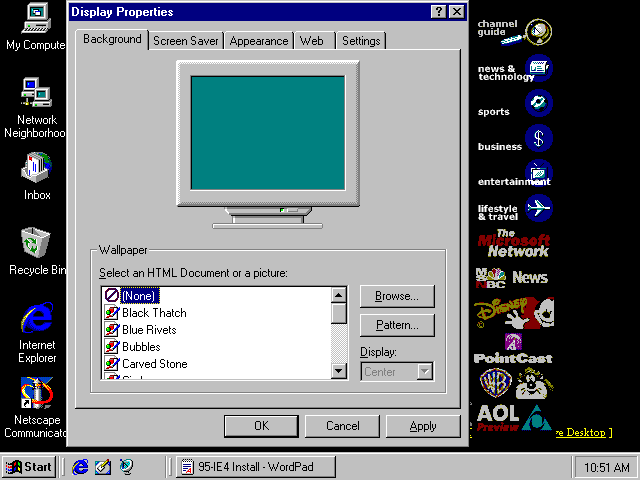
Click on the Background tab. Scroll to the top of the list and click on None. Click on the Apply button then click on the OK button. Your Desktop wallpaper will return to the normal color.

As part of the installation default process this black window (may appear). If it is present simply click on the X in the upper right hand corner to close it.
Step 7: Delete the NT_FF99-IE4.exe file from your Desktop
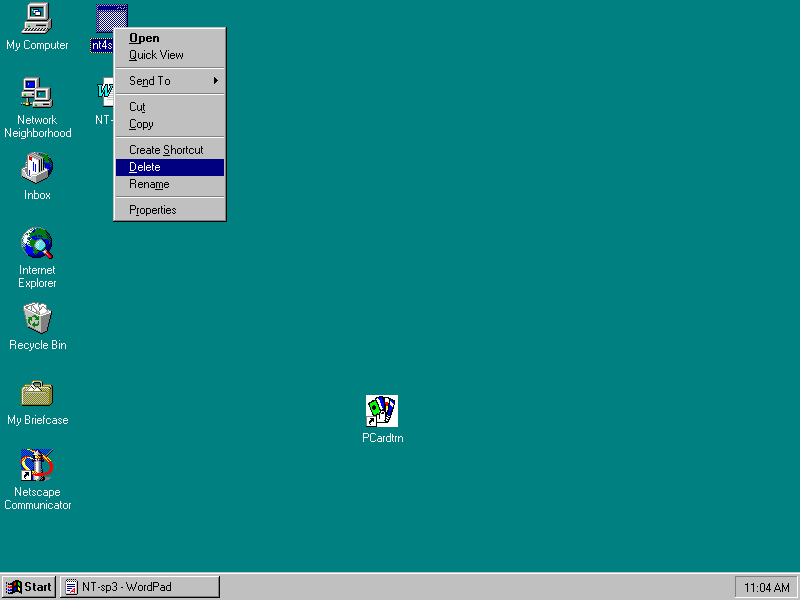
On your Desktop right click on the icon named NT_FF99-IE4.exe. Select Delete from the menu that pops up.

This will open the above window. Click the YES button to delete the installation file. (Remember to empty your Recycle Bin periodically.)
Step 8: Restore Netscape as your default browser
Step 8 is performed only if this installation process installed Internet Explorer 4.0 (IE 4.0). Otherwise go to Step 9.
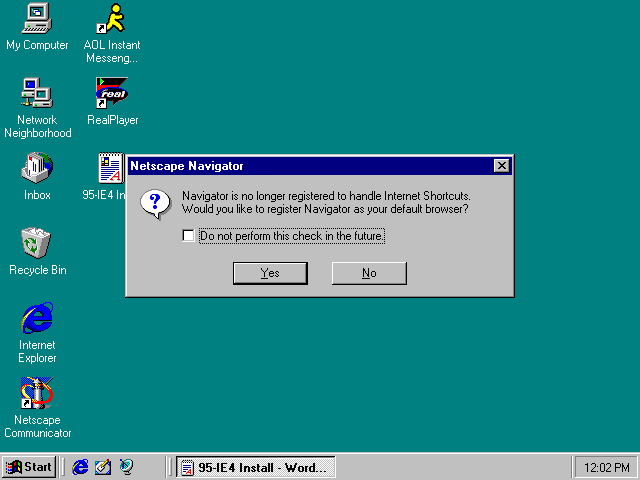
As part of the upgrade process you must re-register Netscape as your default browser. Click on Start, Programs, Netscape Communicator, Netscape Navigator (or click on the Netscape icon on your Desktop). Click in the box " Do not perform this check in the future" and then click on the YES button.
This completes the entire installation process. Congratulations, you are now ready to utilize Electronic Forms (E-forms) for Administrative Information Systems.
Step 9: Open your first form
To retrieve Electronic Forms open Netscape Communicator and then click on Navigator to open your Browser.
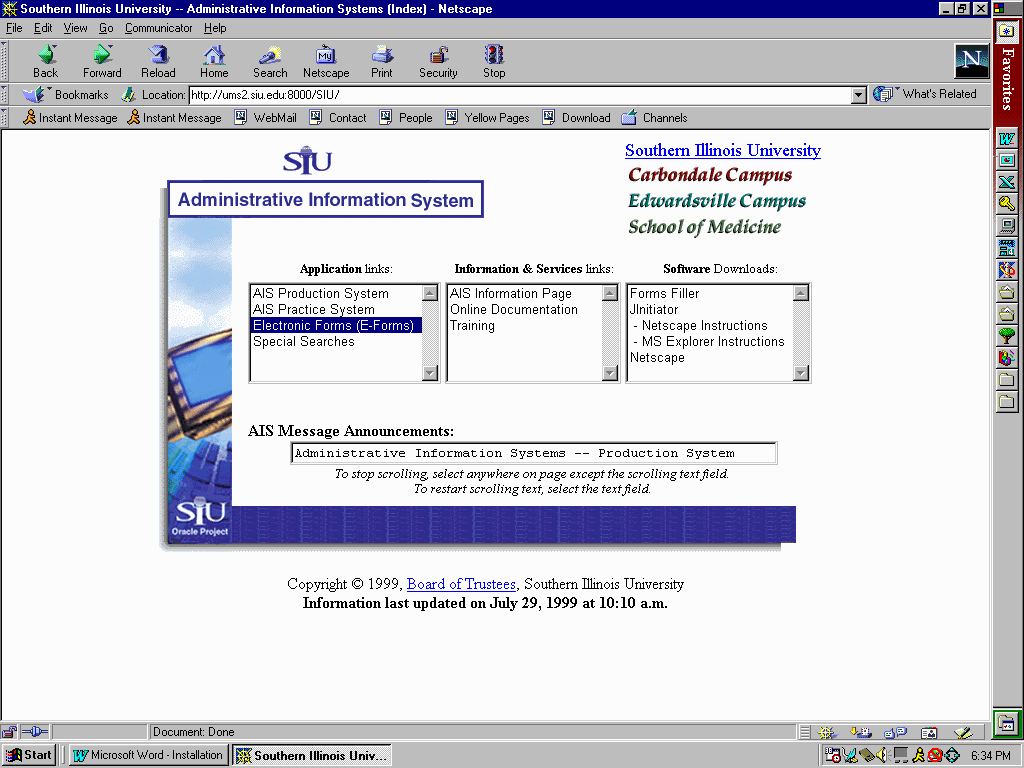
In your Location/Netsite field type in the Universal Resource Locator (URL) for the AIS Home Page: http://ums2.siu.edu:8000/SIU Click on the Electronic Forms (E-Forms) link (shown in the above screen)..PLEASE NOTE: The link from the AIS home page to the Electronic Forms (E-Forms) page will not be active until after Sept 1st. Prior to Sept. 1st retrieve Electronic Forms from http://www.siue.edu/ORACLE/FORMS.
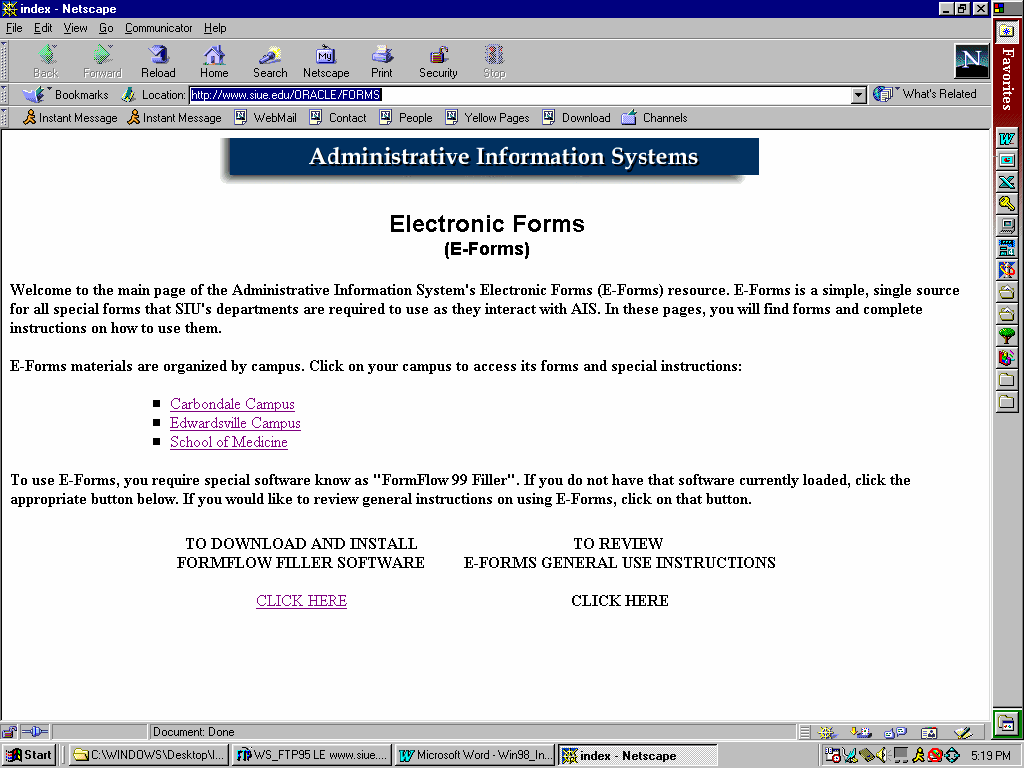
Click on the link for your campus (Carbondale Campus, Edwardsville Campus, or School of Medicine.)
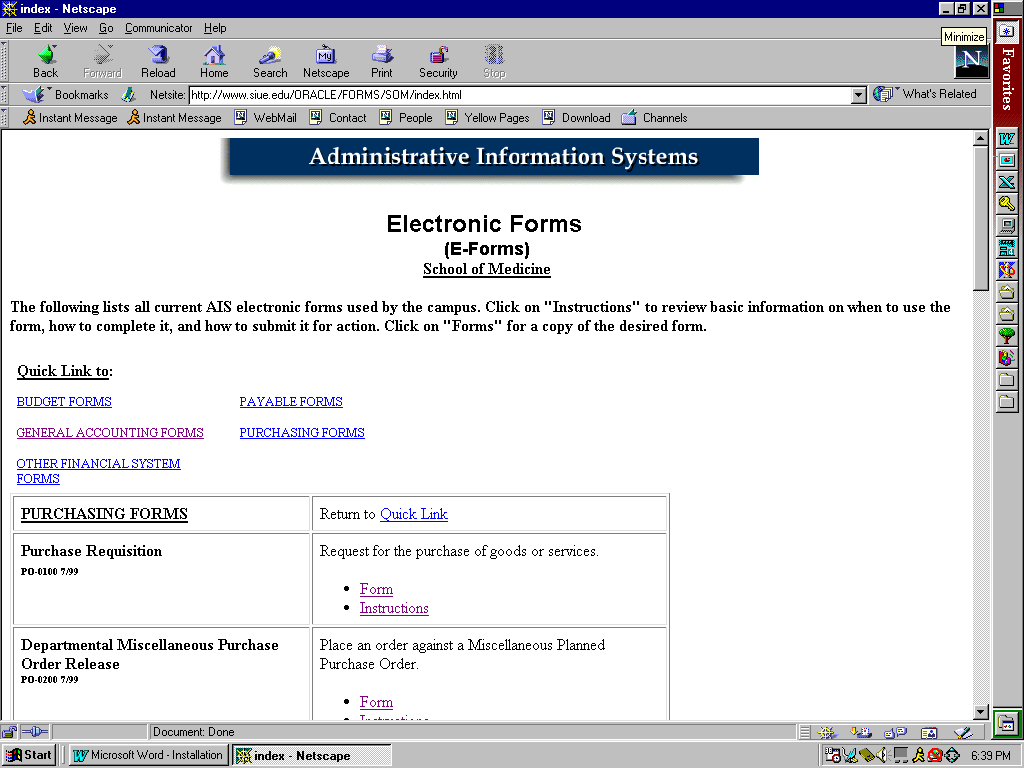
Click on Quick Link to Purchasing Forms.
Click on Form for the Purchase Requisition
Step 10: Pick an Application process.
This process will associate the Form with the Form Flow 99 Filler application, This process may take a few minutes depending on the speed of your PC. This function may not occur until you logon you workstation as yourself (not as an Administrator).
This function will be performed only once (the first time you open a form). When you open subsequent forms the system will know to open the Form Flow 99 Filler application.
If you do not see this screen your system has automatically made the association with Form Flow 99 Filler. Skip to Step 11: Opening Additional Forms.
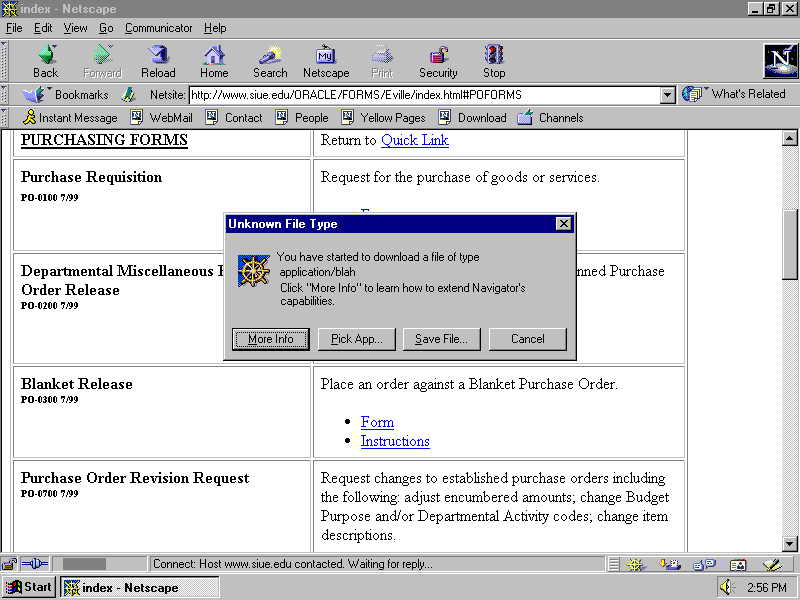
Click on Pick App
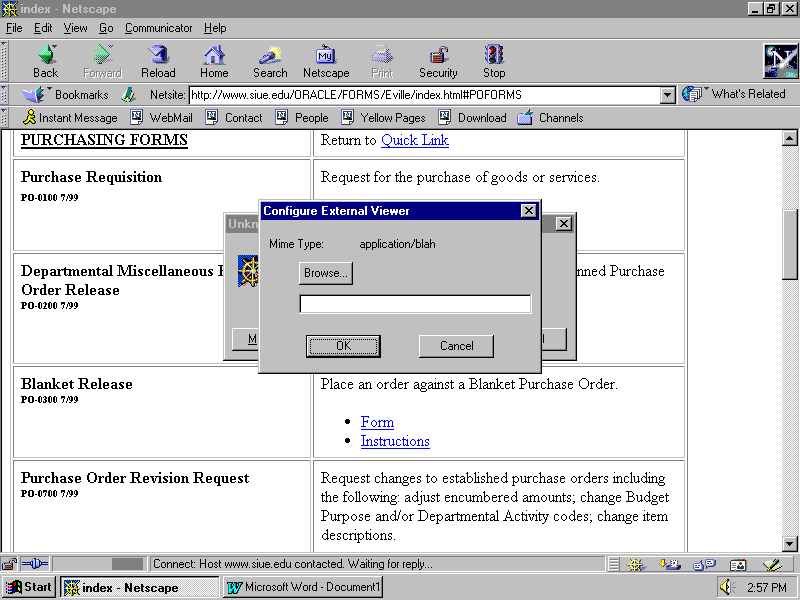
Click the Browse button.
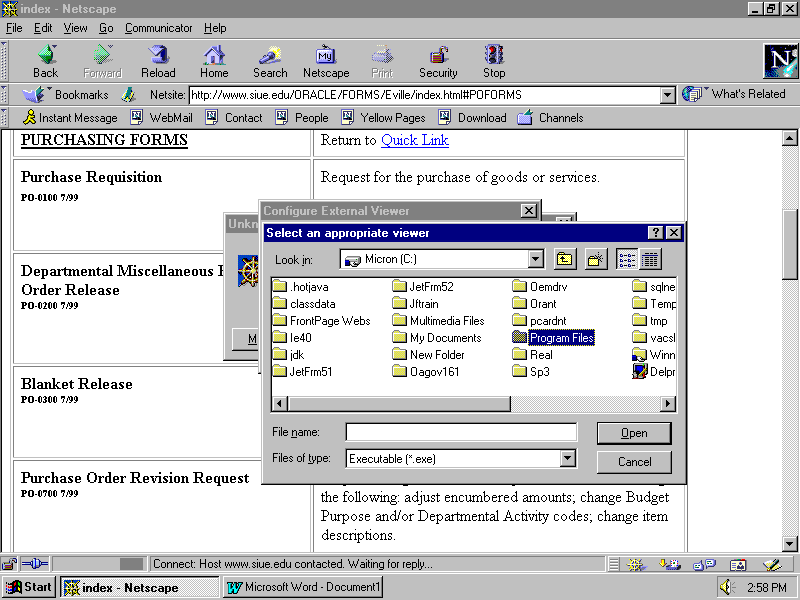
In the Select an appropriate viewer dialog box click on the scroll arrow to the right of the Look in list box. Locate and click on C: (there may be other text in addition to C:).
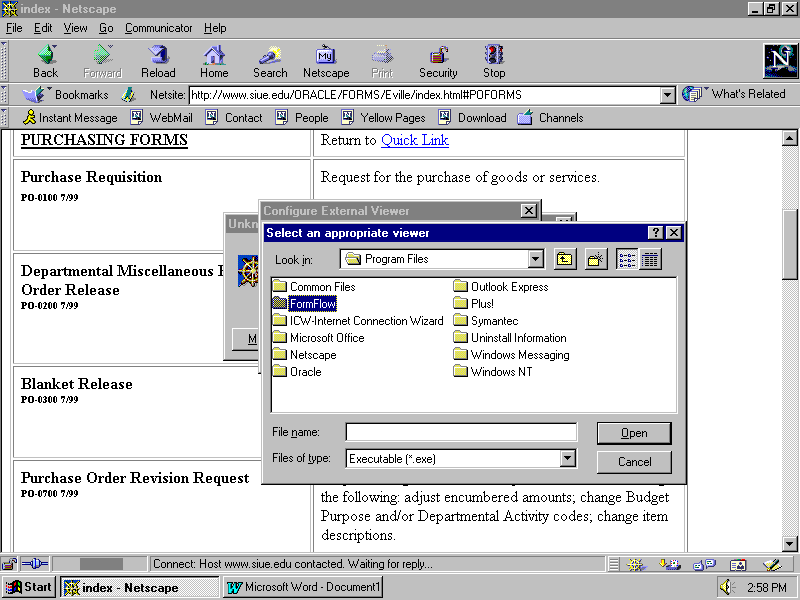
Locate and click on Program Files. Click on the FormFlow folder. Click on the file filler.exe or filler. Click on the Open button.
This will open the Purchase Requisition. This may take a few minutes depending on the speed of you PC.

Congratulations! If you see this form you have successfully installed the software and can use electronic forms.
To close the form click on the X in the upper right corner of the form.
Step 11: Opening additional forms.
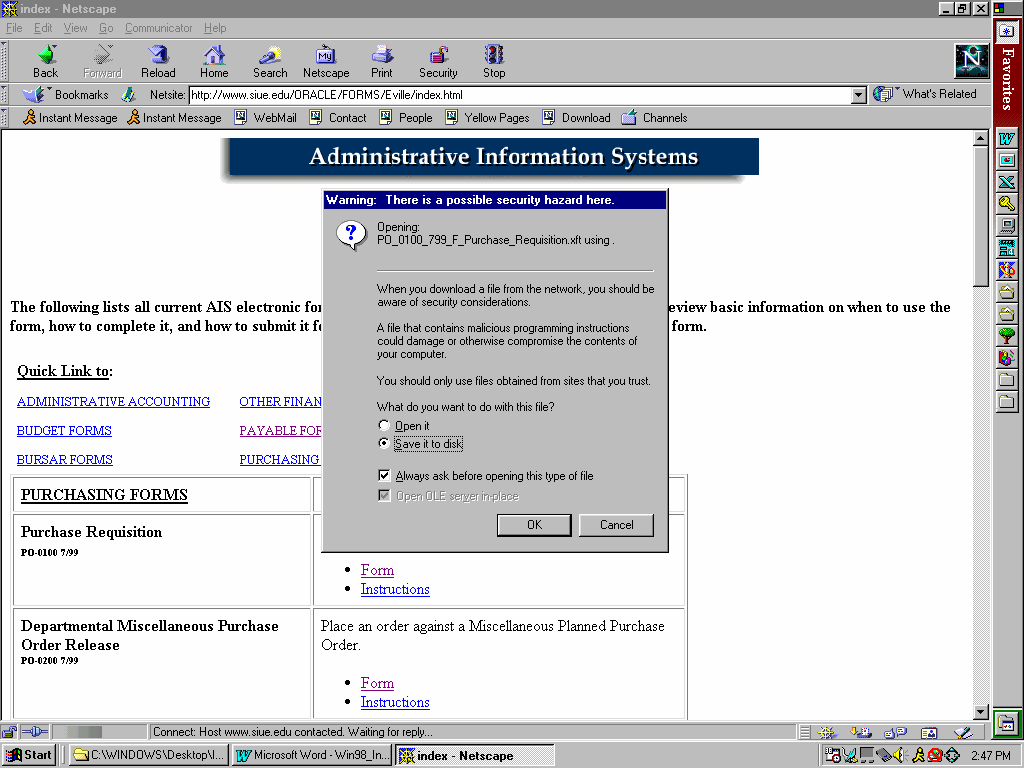
Click on the Form link for the desired form. Click on the Open it button. This will open up the form you selected.
To close a form click on the X in the upper right corner of the form.
Please review the E-FORMS GENERAL USE INSTRUCTIONS available on the Electronic Forms web page.